CLIP FLOORS, COMMERCIAL & RESIDENTIAL
SPECIFIER'S AND INSTALLATION INSTRUCTIONS
C 1.1
SPECIFIER'S INSTRUCTIONS
INFORMATION CLIP FLOORS
|
C 1.0 |
General information |
|
C 1.1 |
Specifier's and |
Table 1
1. SYSTEM SPECIFICATION
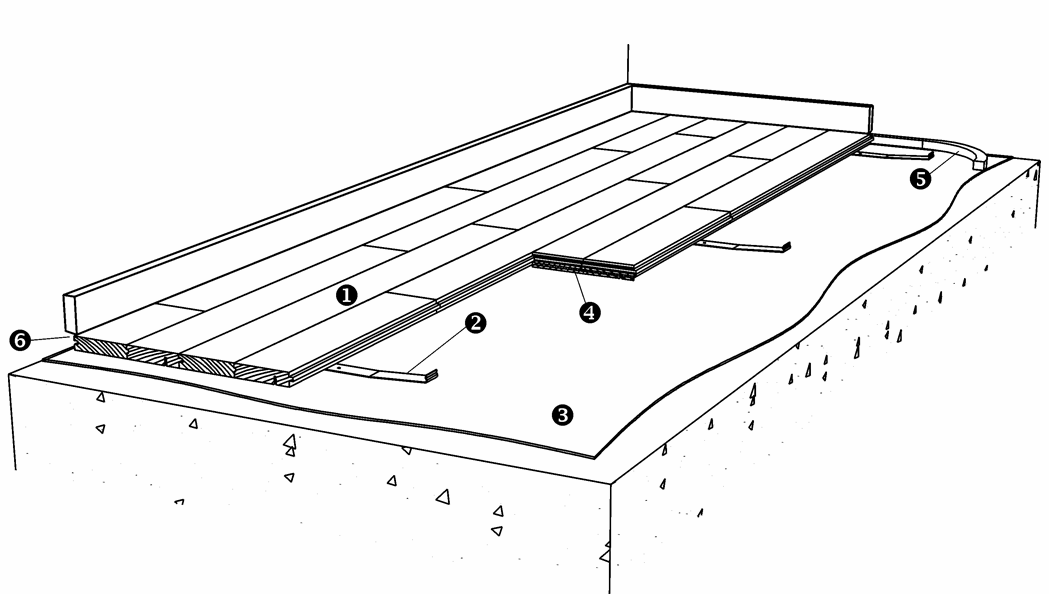
A Junckers floor installed with clips is based on 14 and 22 mm solid 2-strip floorboards, 15 and 20.5 mm solid planks laid on a resilient intermediate layer, which provides excellent walking comfort and at the same time has step-sound reduction properties. Clip installation kan also be used for floors mounted with a ships decking strip.
The system is installed as a floating floor on a dry, loadbearing subfloor of concrete, lightweight concrete, screed or wooden material.
This floor system is for installation in residential and commercial buildings, and can be installed in combination with underfloor heating systems, see Underfloor heating, General information E 4.0. Please note that full documentation of this floor system comprises General information and Specifier's and Installation instructions, see table 1.
2. FLOOR COMPONENTS - JUNCKERS CLIP SYSTEM
- Junckers solid 2-strip or plank floor
Wood species, dimensions, grades and finish:
22x129 mm 2-strip: see B 2.0
14x129 mm 2-strip: see B 3.0
20.5x140 mm Planks: see B 5.0
20.5x185 mm Planks: see B 6.0
15x129 mm Planks: see B 7.0 - Clips
- Intermediate layer
Junckers Foam/PolyFoam
Floor cardboard, 500 g/m2
Polystyrene - SylvaFix header joint adhesive
- 12x12 mm expansion strip
- Expansion gap at the wall
2 mm per metre of floor width on each side, always min. 12 mm (UK: min. 15 mm). Is also required at fixed points, e.g. columns.
Fig. 1
3. LOADBEARING STRENGTH
The loadbearing strength of the clip system depends on the type of load and subfloor. In some cases the total widthways expansion of the floor, depending on the room’s climate and the clip size, can also be of significance. The frequency of point loads is also important.
Table 2 presents stiffness and bearing strength in accordance with the load classes in EN 1991-1-1. For further definition of load classes and types, see C 1.0 – Stiffness and bearing strength.
|
Table 2 |
Loading types |
|
|
Loading category |
Area- and point load |
Wheel load |
|
A+B: |
Approved (all products) |
Approved (all products) |
|
C1+C2+C3+D1: |
Approved (20.5 and 22 mm only) |
Approved (20.5 and 22 mm only) |
* On top of the polystyrene a load spreading sheet of minimum 10 mm chipboard or plywood with tongue and groove are used.
4. SUBFLOORS
Subfloors can be of concrete, lightweight concrete, screed and wooden materials.
Wooden subfloors of chipboard, MDF, plywood or floorboards fixed to battens or joists must be of sufficient inherent stiffness with a load bearing strength which is adequate for the use of and the expected load on the floor. The moisture content of wooden subfloors must be in balance with the relative humidity of the room, i.e. 6-12 % moisture content.
If several types of subfloors make up the same floorspace, the subfloor must be of uniform elasticity and flatness, to ensure that the final floor is uniform.
5. BEFORE BEGINNING TO INSTALL THE FLOOR
The building must be weather tight. The heating system must be installed and tested and during the heating season should be in operation. Cast concrete elements, screeding and other wet trades, which contribute moisture to the building, e.g. tiling, plastering and priming of paintwork, must also be completed.
The relative humidity in the building must be between 35-65 % RH and the temperature approx. 20 °C. The residual moisture contained in the concrete or screed must not exceed 90 % RH (UK: max. 75 % RH acc. to BS 8201). In wooden based subfloors the moisture content should not exceed 12 % .
Solid floorboards should always be laid immediately on their arrival at the building. Wrapping of the packages must not be removed until just prior to laying the floor, i.e. no acclimatising of the floorboards on site must take place.
6. ADHESIVE
All floorboard header joints are glued with Junckers SylvaFix, header joint adhesive. Never apply adhesive to the longitudinal sides of the floorboards, except for the floorboards in the last row, if the clip-groove is cut off.
7. INTERMEDIATE LAYER
The intermediate layer must ensure good walking comfort and step-sound reduction properties. The stiffness of the intermediate layer must be adjusted to avoid too much movement underfoot, furniture movement, etc. due to excessive deflection when walking on the floor.
Moisture conditions, requirements of thermal insulation and any adjustment of the height of the floor structure are crucial to the final choice of intermediate layer. The sections "Thermal insulation" and "Moisture protection" specify a number of products as follows:
- Junckers PolyFoam, a step-sound reducing underlay incorporating a moisture barrier.
- Junckers Foam, a step-sound reducing underlay.
- Floor cardboard, 500 g/m².
- Junckers Sylvathene Moisture barrier, 0.2 mm PE membrane
- Flooring grade Polystyrene with densities of 30/40 kg/m³, depending on board thickness and load, see section 3, Loadbearing strength.
8. THERMAL INSULATION
Floating floor structures provide good conditions for thermal insulation with an intermediate layer of polystyrene. The subfloor for polystyrene can be of concrete or wooden materials. See section 9 "Moisture protection".
Fig. 2
9. MOISTURE PROTECTION
Concrete and screeded subfloors
The residual moisture contained in the concrete or screed must not exceed 90 % RH (UK: max. 75% RH acc. to BS 8201).
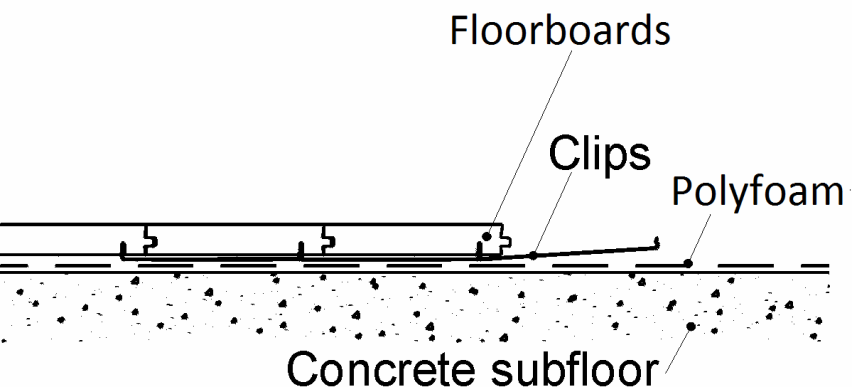
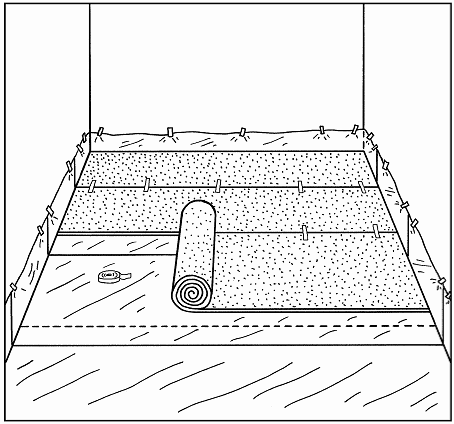
At ground level as well as upper floor levels protection against residual moisture in the concrete/subfloor is required and controlled by laying Junckers PolyFoam on the surface of the concrete, see Fig. 2. On ground level this also protects against radon penetration. Junckers PolyFoam is laid with joints fully closed and taped in place. The PolyFoam has to be turned up at walls till upper edge of the floor.
Fig. 3
Polystyrene boards
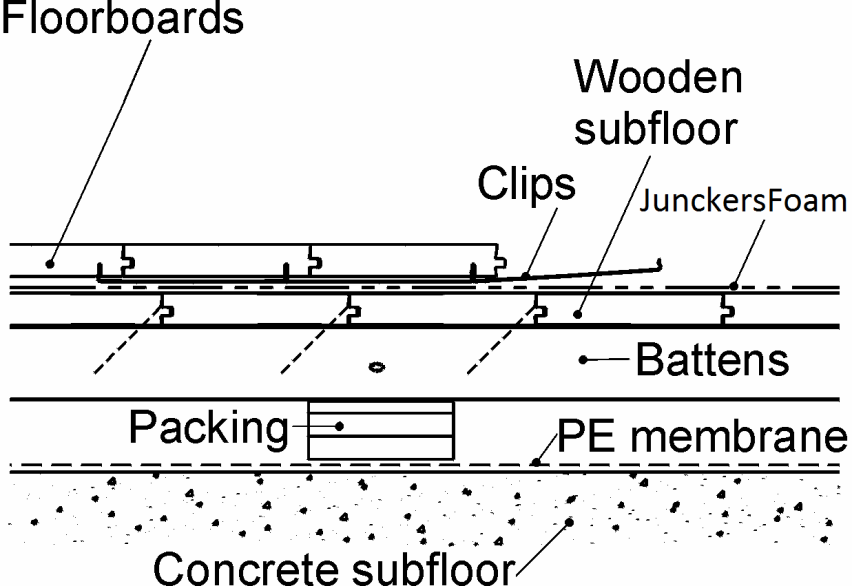
Where polystyrene boards are laid and there is a risk of moisture seeping up from below, Junckers Sylvathene moisture barrier, 0.20 mm PE membrane must be laid on the polystyrene board.
Wooden subfloors
JunckersFoam is used as an intermediate layer directly on the wooden subfloor, see Fig. 3.
Fig. 4
Wooden subfloors above ventilation spaces
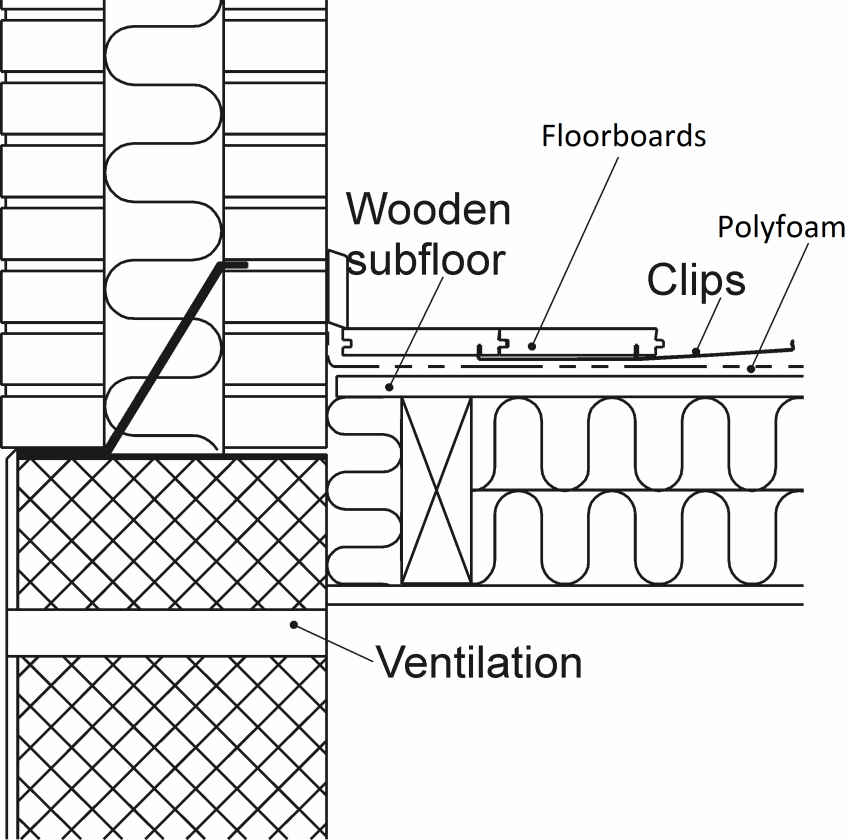
On wooden subfloors above ventilation spaces Junckers PolyFoam can be used as an intermediate layer, providing that the space is ventilated effectively and that the underside of the insulating layer is open to diffusion.
If the ventilation space is damp, Junckers Sylvathene moisture barrier, 0.20 mm PE membrane must be laid on the floor of the ventilationspace, see Fig. 4.
10. FLATNESS OF THE SUB FLOOR
The subfloor must be levelled so that any deviations in the flatness do not conflict with the requirements of the method stated below.
Straight edge:
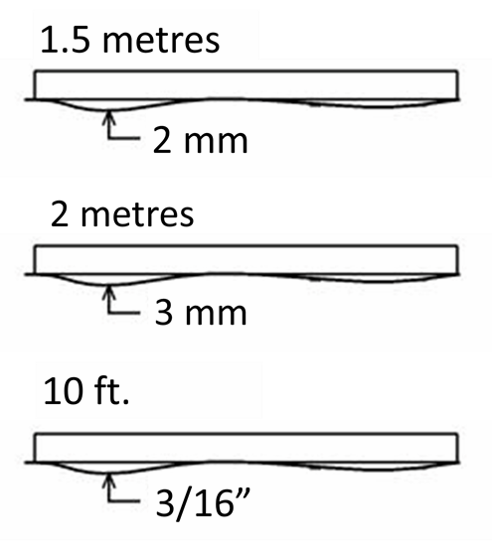
The subfloor must be flat with a maximum deviation of 2 mm under a 1.5 m straight edge.
(UK: 3 mm under a 2 m straight edge).
(US: 10 ft. under a 3/16” straight edge).
Deviations are measured as gaps under the straight edge. The surface must be smooth. Any irregularities must be corrected by grinding or by using a self levelling compound.
11. DISTANCE RULES & EXPANSION GAPS
Distance to walls and fixed points: 2 mm per metre of the floor width on each side, however always min. 12 mm (UK 15 mm).
Is also required at fixed points, e.g. columns and fixed kitchen cupboard. Kitchens are considered fixed installations, unless the kitchen cupboards are mounted on legs not attached to the wood floor.
Expansion gaps: To minimize the movements in the floor caused by fluctuations in the climatic conditions in the building, it will, for large commercial floors, be necessary to build in expansion joints. The expected climatic conditions will decide the actual dividing of the flooring.
Contact Junckers Technical Service for advice.
12. CLIPS
Clips are available in different sizes according to various air humidity ranges. The clip size is selected primarily on the basis of the expected maximum relative humidity in the building during the course of the year.
For residential and commercial floors typically applies as indicated in Table 2, but be aware of:
- Larger areas : In order to minimize the overall movements of larger floors and allow for varying RH in different types of buildings, it may be necessary to choose a larger clip than the one corresponding to the expected maximum RH.
- Commercial buildings: The relative humidity in office buildings, shops and similar can deviate from that in residential buildings, thus requiring a different clip size.
- With all clip sizes there will always be gaps when the relative humidity falls to, or below, the lower end of the recommended range.
|
Clip type |
Humidity |
Clip size |
Gaps between |
Note |
|
0-hole (white) |
10-40** |
128.8 mm |
depends on |
The 128.8 mm clip is used in arctic and desert areas. |
|
1-hole (green) |
25-55** |
129.1 mm |
0.1 mm |
|
|
2-hole (yellow) |
40-65 |
129.4 mm |
0.4 mm |
15 x 129 mm, 20.5 x 140 mm planks and 20.5 x 185 mm Boulevard planks: |
|
2½-hole (Black) |
55-75 |
129.6 mm |
0.6 mm |
|
|
3-hole (red) |
65-85 |
129.8 mm |
0.8 mm |
Shipsdecking: Always use minimum 129.8 mm clip. |
|
4-hole (Orange) |
75-95 |
130.2 mm |
1.2 mm |
|
|
5-hole (Light blue) |
75-95 |
131.2 mm |
2.2 mm |
The 131.2 mm clip is only suitable for 20.5 x 185 Boulevard planks. |
Table 2
**In a very dry environment there will be some larger permanent gaps between the floorboards. Specifiers are advised to contact Junckers Technical department if such conditions are anticipated.
Number of clips required for 14 and 22 mm 2-strip:
Residential: 13 clips/m2 (clip spacing 700 mm).
Commercial: 17 clips/m2 (clip spacing 500 mm).
Number of clips required for 15 and 20.5 mm Plank:
15 x 129 mm: 17 clips/m2 (clip spacing 500 mm).
20.5 x 140 mm: 16 clips/m2 (clip spacing 500 mm).
20.5 x 185 mm: 13 clips/m2 (clip spacing 500 mm).
Number of clips required for Shipsdecking:
129 mm floorboard width: 17 clips/m2 (clip spacing 500 mm).
20.5 x 140 mm: 16 clips/m2 (clip spacing 500 mm).
20.5 x 185 mm: 13 clips/m2 (clip spacing 500 mm)
13. STEP SOUND REDUCTION, HEAVY DIVISIONS
22 or 20.5 mm floorboards on Junckers Foam or PolyFoam: 16 dB
22 or 20.5 mm floorboards on cardboard wool felt, 500 g/m²: 15 dB
14 or 15 mm floorboards on Junckers Foam or PolyFoam: 17 dB
14 or 15 mm floorboards on cardboard wool felt, 500 g/m2: 16 dB
For general information about sound and practical guidelines on acoustics in floor constructions, see E 5.0.
14. NET CONSUMPTION OF MATERIALS
Floorboards: Total area + approx 2-3 % waste
Clips: See section 12 "Clips"
Junckers Foam/PolyFoam: Total area + approx. 10 % waste
Sylvafix header joint adhesive: 1 bottle, 0,75 l for approx. 50 m²
Expansion strips: 2 x floor width
Junckers Sylvathene moisture barrier, 0.20 mm PE membrane: Total area + approx. 10 % waste.
INSTALLATION INSTRUCTIONS
1. INTERMEDIATE LAYER
Subfloors of concrete
On concrete and screeded floors use PolyFoam as an intermediate layer, with lapped joints (remember to use the built-in tape) and turned well up at walls, etc.
Subfloors with underfloor heating
Place an extra moisture barrier, Junckers Sylvathene, 0.20 mm PE membrane.
The moisture barrier must be laid with an overlap of 200 mm at all joints, continuing up walls, etc. The moisture barrier has to be taped at all lap joints using a tape 50 mm vide.
Wood based subfloors
On wood based subfloors Junckers Foam is used as an intermediate layer with close fitting joints.
Intermediate layer of Polystyrene
Place Junckers Sylvathene moisture barrier, 0.20 mm PE membrane with 200 mm overlay at all joints. On top of the polystyrene a load spreading sheet of minimum 10 mm chipboard or plywood with tongue and groove is used, see section 3 Loadbearing strength.
2. CLIPS, ADHESIVE & EXPANSION STRIP
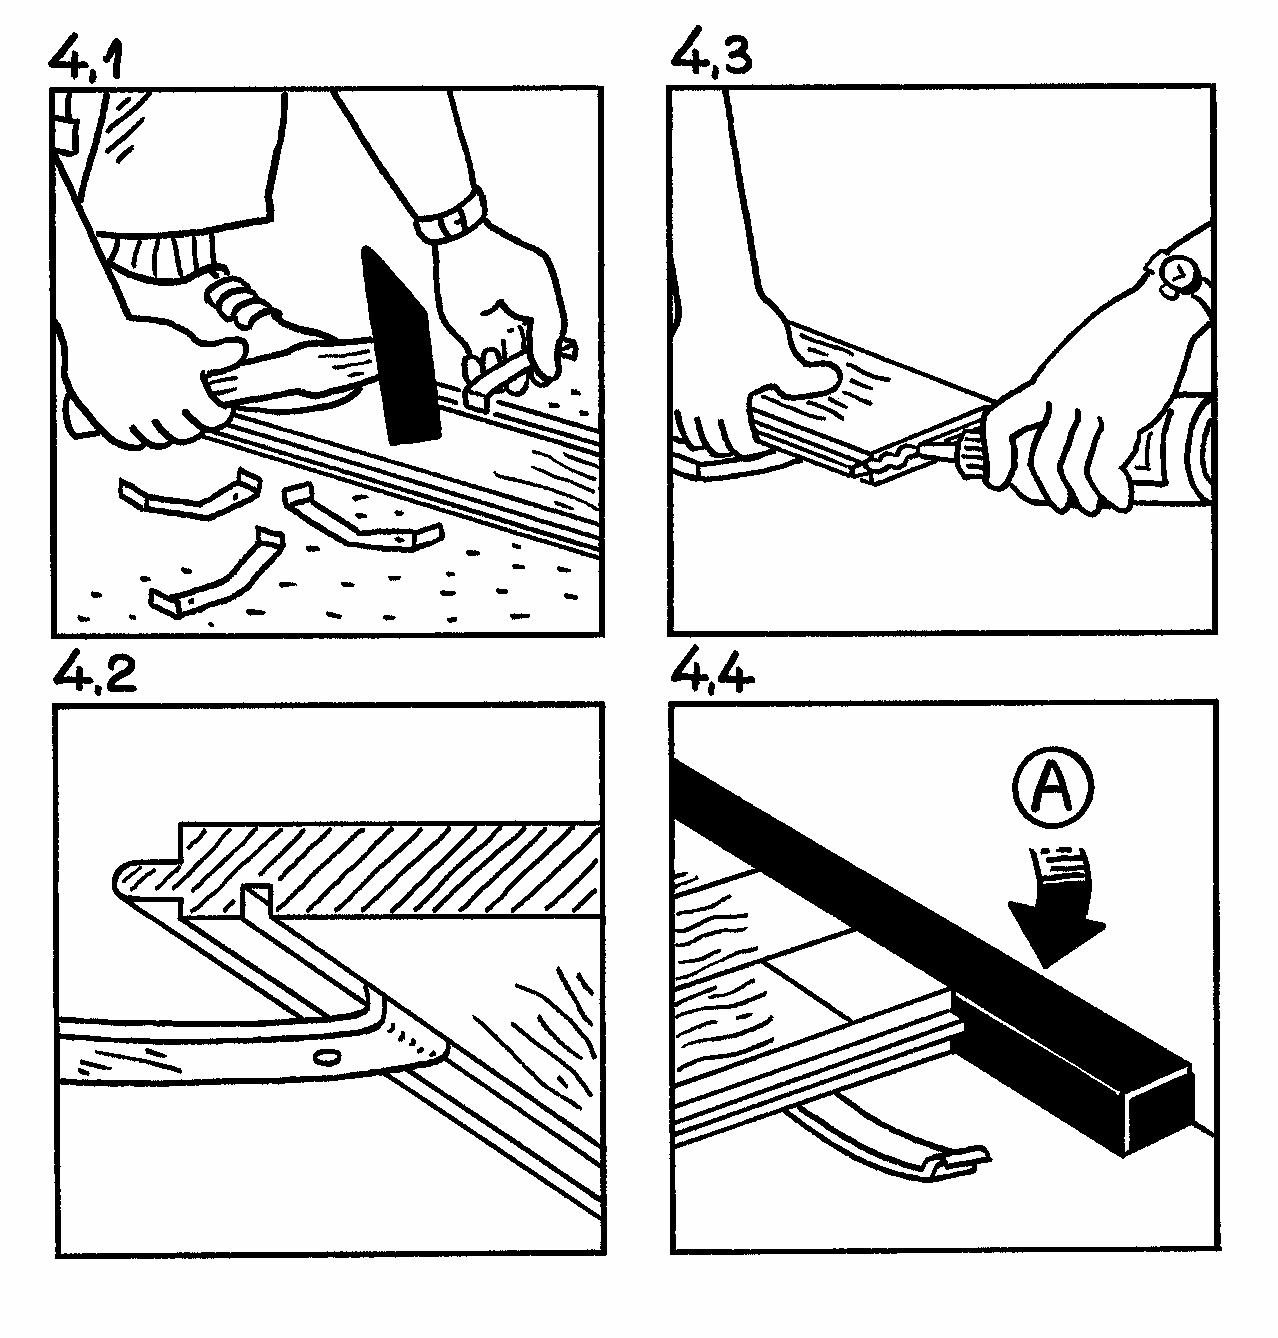
It is recommended that the floorboards are laid parallel with the longest side of the room. Turn the floorboard over and tap the end of the clip with the hole(s) into the groove on the back of the floorboard, so that the plain end of clip points in the direction of the tongue, which is the laying direction (Fig. 4.1 and 4.2).
Note, 2 clip grooves on planks:
140 and 185 mm planks have a double clip groove: tap the end of the clip with the hole(s) into the groove on the back of the board closest to the tongue.
Lay the floorboard in place, tongue pointing away from the wall. Continue to the end of the row, gluing the header joints (Fig. 4.3). Solid floorboards must never be glued lengthwise. Cut the last floorboard to length, use the offcut to start the next row.
The gap between the end of the floorboards and the wall is filled with Junckers expansion strip. Ensure a close fit (Fig. 4.4).
3. DISTANCE TO WALLS AND FIXED INSTALLATIONS
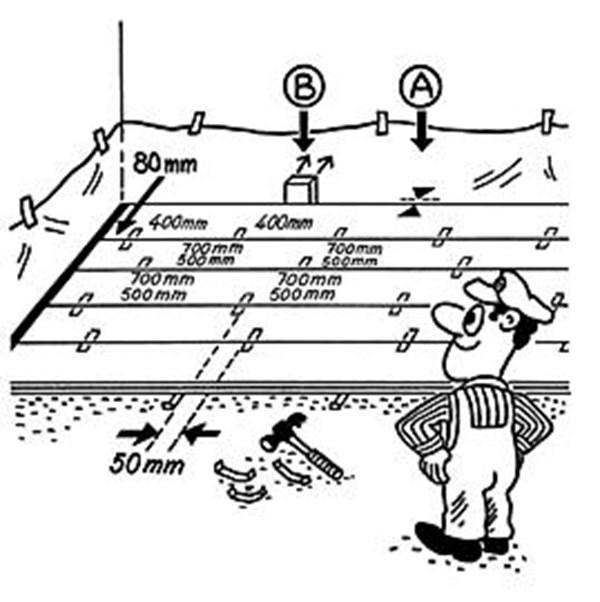
The first and last row of boards is installed leaving a clear expansion gap at the wall using following directions: The distance (A) between the floorboards and walls/vertical fixed installations is calculated as 2 mm per running metre of floor width on each side.
First and last clip: Maximum 80 mm from the end of the floorboard. Other clip spacing: First and last row 400 mm centres. All other rows the distance must be either 500 or 700 mm, depending on floor type and use, (see section 12, Clips). Always use at least 2 clips per floorboard.
Clips must be staggered (in line) by approx. 50 mm. Use temporary spacers or wedges between the wall and the first row of floorboards to form the expansion gap (B).
To lay subsequent rows of floorboards, tap the joints together, using a wooden block working evenly along the board.
4. PATTERN AND LAST ROW
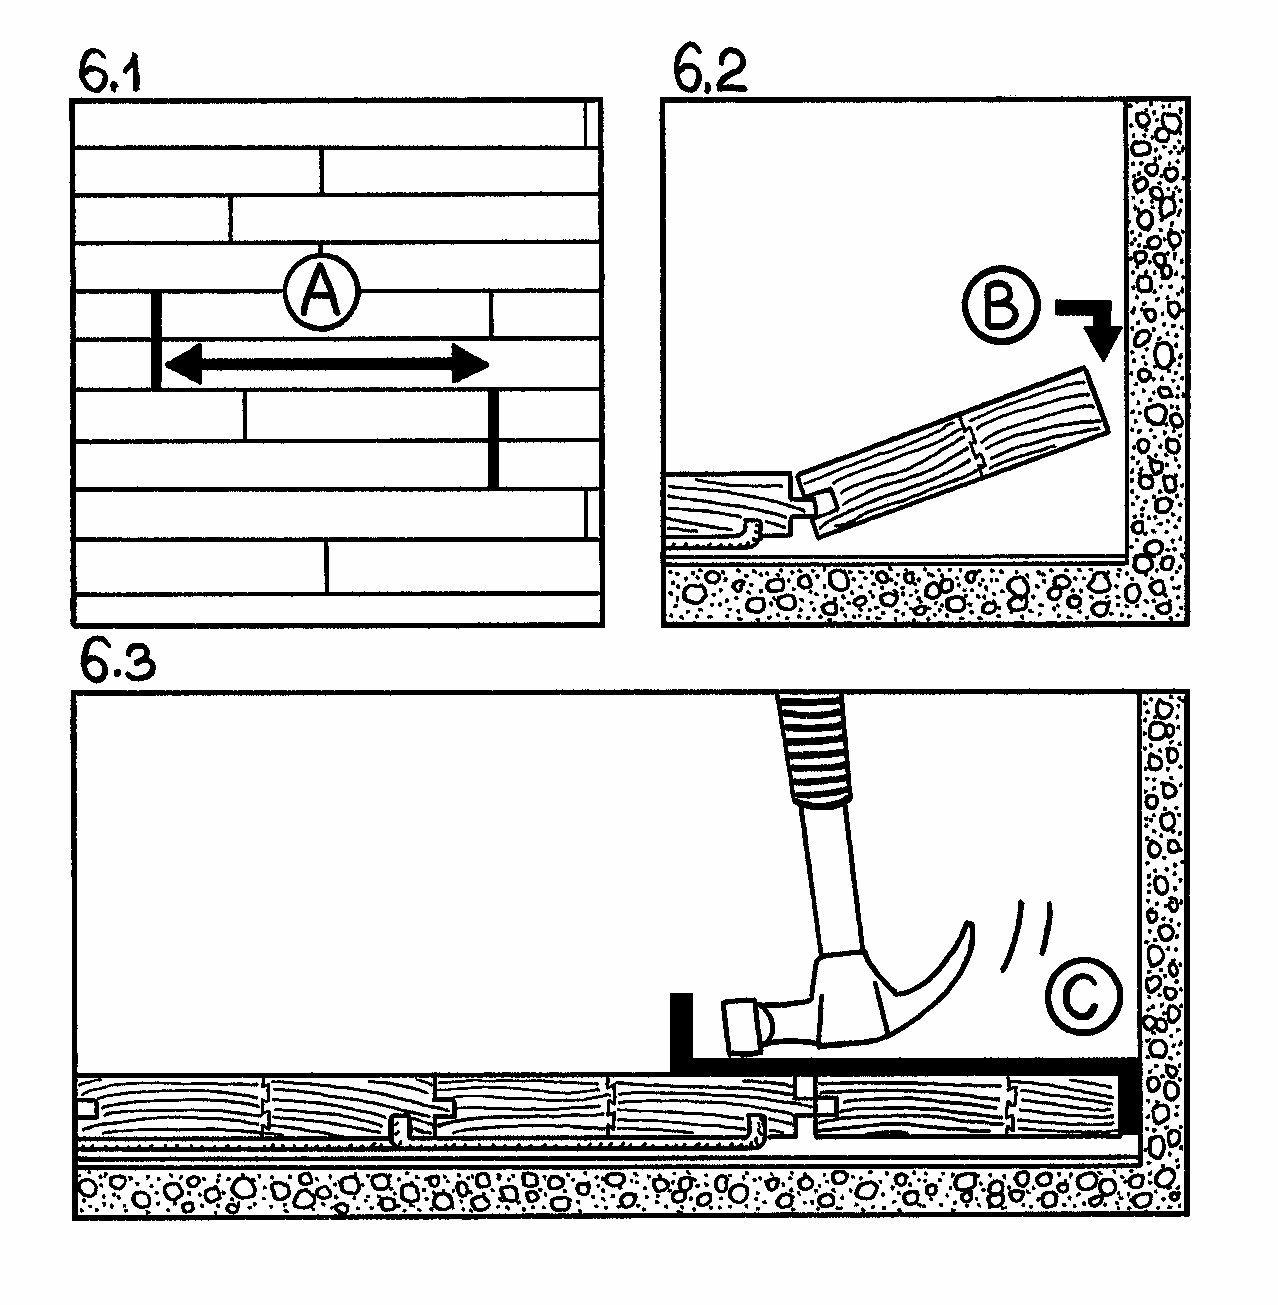
Lay the floorboards to a random pattern. Distribute the header joints as far apart as possible. However, the distance (A) between floorboard joints in two successive rows should be at least 250 mm (Fig. 6.1).
Stave joints of in one row of 14 and 22 mm floorboards should not be in line with stave joints in a neighbouring row, but must be spread as far as possible.
Cut the last row of floorboards to form the correct size of expansion gap at the wall (Fig. 6.2). Glue the last floorboard to the adjacent floorboard along the entire length of the floorboard. This is the only exception from the rule never to glue lengthwise along floorboards (Fig. 6.2). Use a joint puller to slot the last board into place (Fig. 6.3).
Remember to remove temporary spacers or wedges at walls before installing skirtings.
5. PIPES AND DOOR FRAMES
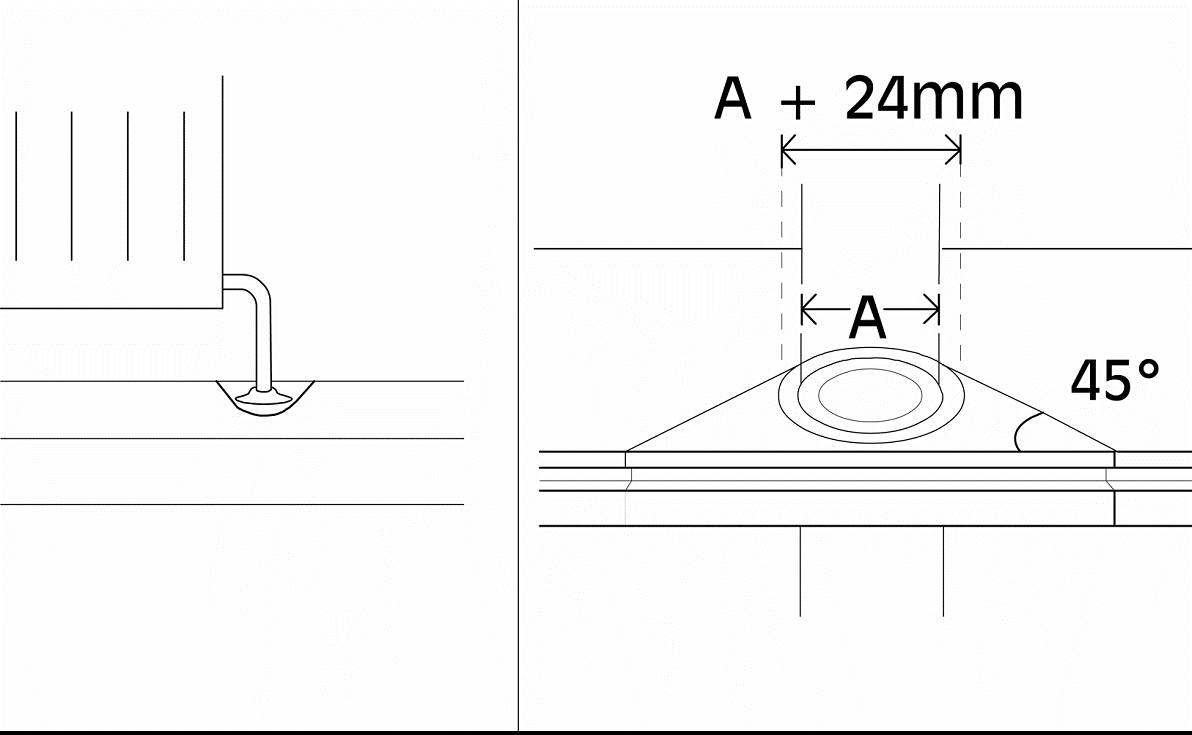
Around pipes, drill a hole in the board to accommodate the pipe. The space around the pipe must be the same as the expansion gap at the wall. A tapered wedge is cut out, so that it can be glued in place. This gap is covered using a radiator pipe cover.
At door frames and architrave’s, cut the base of the frame and architrave to allow the floor to fit underneath. At the threshold the expansion gap can be covered by a threshold strip or, if levels reduce, fit a ramp.
6. CHANGING LAYING DIRECTION
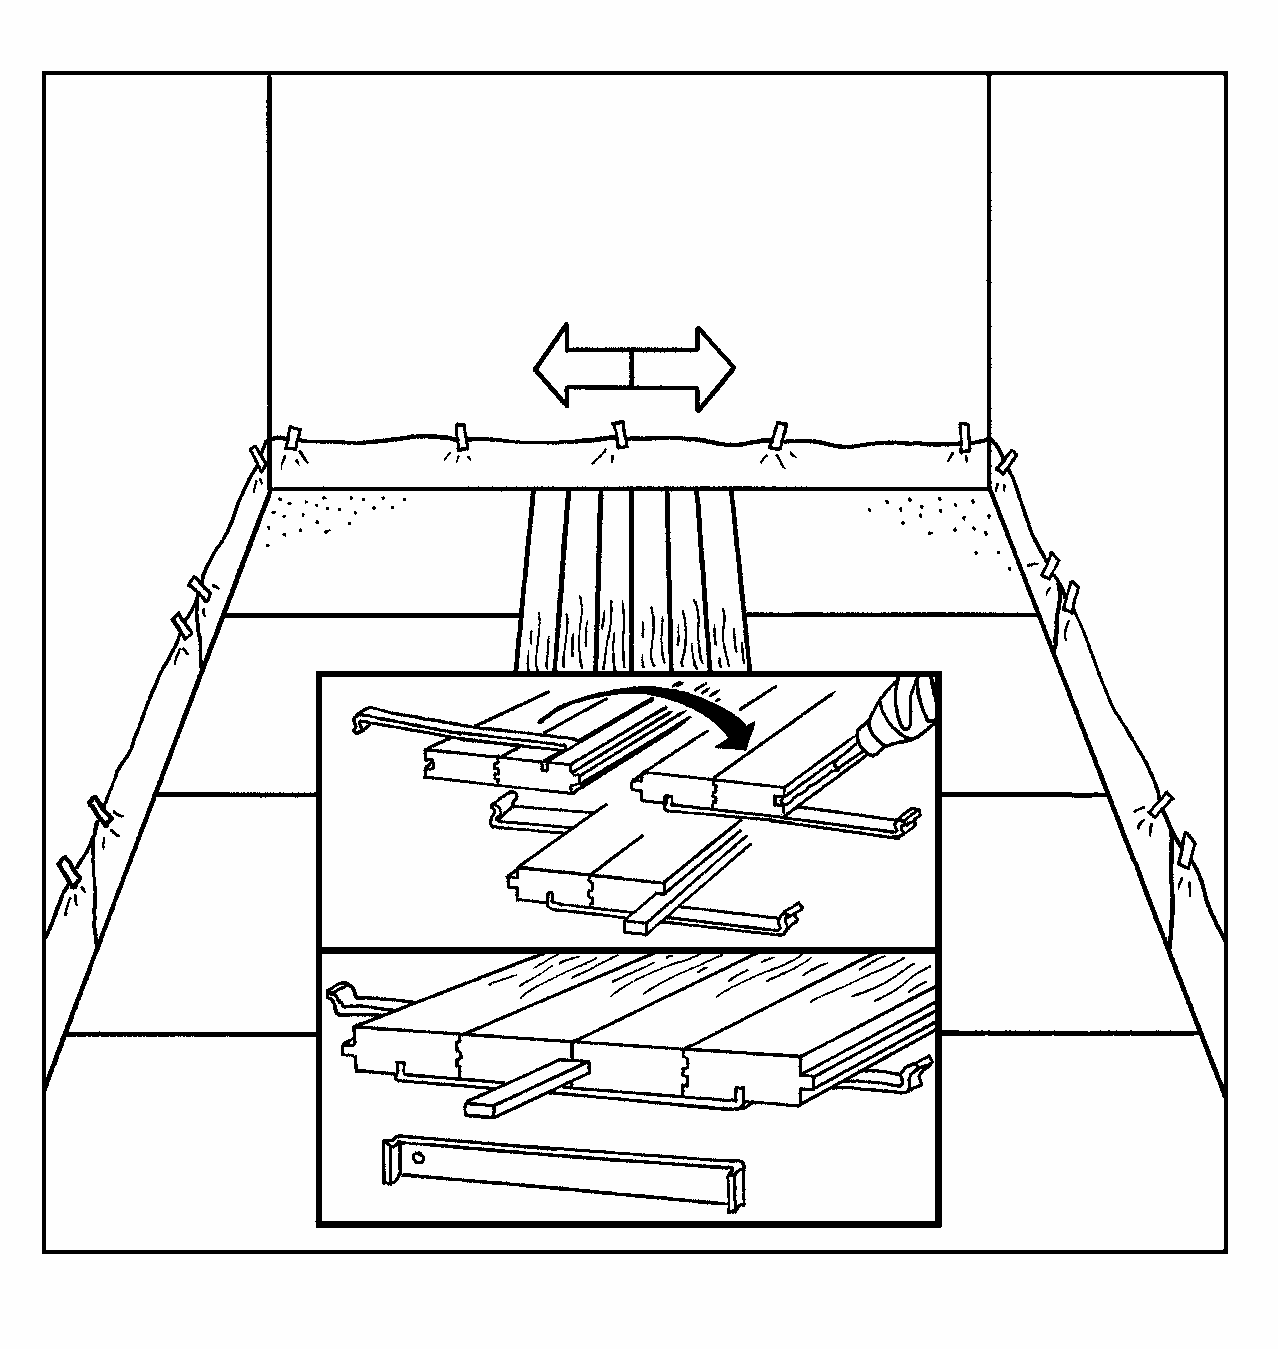
When laying large floor areas or when needing to change the laying direction it is recommended to use Junckers 2-way clips.
The two rows of floorboards are laid with the two way clips and a loose tongue which is glued to one floorboard along the full length. Afterwards the laying is continued with normal clips according to the instructions.
A floor surface of min. 15 floorboards in the width in one laying direction must be laid before the laying in the opposite laying direction is begun. This is done in order to avoid unevenness in the line of the floorboards.
The clip distance for 2-way clips is 300 mm and for normal clips 500 or 700 mm. To prevent the clips from touching each other, alternate them in line at intervals of about 50 mm.
Note: Remember to place the normal clips together with the 2-way clips, at the two rows of floorboards.
